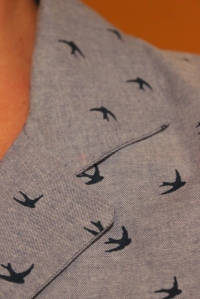
Having finished my muslin on Friday, I was keen to get started on the real deal. I’m making version A of McCall’s M4769 out of the wonderful bird print I picked up at the Knitting and Stitching show in March. I have long been obsessed with bird prints and was pretty excited with April’s Monthly Stitch challenge being ‘Put a bird on it’. The moment I saw the fabric I knew I wanted a sleeveless dress, semi fitted and buttoned down the front. It was pure chance that I had this pattern in my stash, just waiting to be used.
I decided that in an effort to make it perfect, I’d try approaching sewing the dress a different way. Instead of dreaming about the end product which I normally do, I’d approach each step as though that was the pinocle. Hoping that that way, I’d do every little step just right and in the end, have a perfectly sewn, wonderfully fitted, good looking dress.
To start off, I took extra care cutting out the pieces and transferring all the markers. I recently got some new chalk pencils which have worked a treat (pack of three Clover Water Soluble Pencils – pink, blue & white). As a result my darts are so good, even if I do say so myself – the ends are perfect, seamlessly part of the bust you wouldn’t even know they were there! (I’m trying not to let my head get too big at this stage but its good to celebrate success when you get it right?
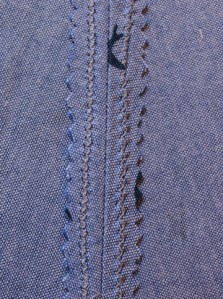
 Arriving at the shoulder seams I had to decide how I wanted to do my insides. I’d been toying with the idea of French seams,or even felting my seams. But in the end I just went with the reliable (if less stunning) zig-zag and pinking shears finish. Mainly I went for this option because I was afraid the waist would feel a bit bulky. In the spirit of last month’s showing challenge, thought I’d share with you what my seams look like (almost like baring your soul right?).
At the side seams (which at the armpit end are a size 12 and the waist end are a size 14) having done my muslin, I knew that I wanted a touch extra breathing room right at the waist. So I sewed on a 5/8″ seam allowance down from the armhole to the front dart, and the just shy of 1/2″ from the dart down to the waist. Seams finished and pressed, I’m making slow but meticulous progress!
Now for some reason the armhole facing piece never seemed to merge from the pattern pieces – no idea why or where it went. But not to worry as I had decided to using bias bind for the armholes anyway. I’m currently going through a bias binding phase which I’m blaming on the GBSB. I love how it looks – such a clean finish! I think I do my armholes with much more caution when using bias binding and as a result end up which a much nicer finish. I attached the bias binding to both armholes, trimmed and pressed, but then was hit with a dilemma.
I’ve been using white thread so far but would that be too stark a contrast to use on the top of the fabric? I didn’t have a blue that worked at all despite currently having about 7 different blues in my thread collection. I hummed and hawed. What I really needed to do was go out and get the right damn thread (and buttons while I was at it). But while Walthamstow has fantastic fabric shopping options, notions galore etc I have yet to find anywhere that sells good quality thread (or invisible zippers for that matter). And here I was almost 4pm on Saturday, still in my PJs with no intention of getting dressed – faced with having to get my ass in gear and cycle over to Stoke Newington for some thread. I decided that before I did that, I’d do a quick test to see what the white and one of my blues looked like. And what do you know? The white actually looked just fine. Pheww, I can remain in my PJs a few hours more!
Progressing onto the skirt and pockets everything was going just fine until I realised I’d forgotten to to sew the up part of of the side seams on a 1/2″ allowance. I considered ignoring that glitch and continuing on. But decided that the whole purpose of taking my time was to ensure I had something I’d be happy with at the end (and fit is a big part of that!). Also it was such a small section to un-stitch I quickly was able to right the error of my ways. And I’m so glad I did. When I got to joining the skirt to bodice – the side seams were just in the right place (this I admit is a rare feat for me – I’m often out by a hair and it irks me).
I decided that was a good place to stop for the day. I was progressing well, no disasters yet and I didn’t quite have the energy to start the collar.
 Sunday morning I got started on the collar. I carefully followed instructions but I wasn’t confident. I knew how it was suppose to go and how it was suppose to turn out, but for each side, it was so so awkward. That’s definitely the best way to describe it – AWKWARD. The first side as I turned it right way out after having attached the collar and facing, I expected it to be all wrong and was shocked and surprised that it had actually worked. The same for the second side. It actually worked. I don’t really understand why because I was sure I hadn’t done it right but sometimes I guess blindly following instructions when you don’t understand works.
I decided I wanted a 2″ hem – I like big hems (and had decided a little late in the game I wasn’t the dress to be a bit shorter). I decided to use the blind hem stitch on my machine versus hand sewing – the lazy option I know. Also as I have no blind hem machine foot, its not always invisible. But it came out not too bad. All that left was the button holes and buttons.
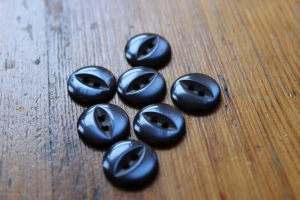
 At lunchtime today I wondered up to Raystitch in search of buttons, I love buttons and think they can either make or break your creation. The ones I got don’t overwhelm me either way, which what I think this dress needs. I wanted buttons that just would melt into the background and I figured these would do the job.
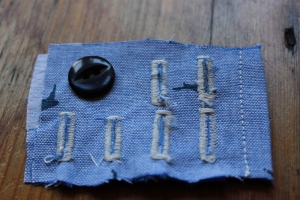
 Now I’m not terrible at button holes but I’m also not wonderful at them. Too often, when I am finished they seem a little off – the ends much thicker than the sides, and the sides never seem to have the same thickness to each other. As its been a long time since I did any, I decided to make myself practice before attacking my dress. After doing a few in the same off white I used on the armhole bias binding, I realised I probably should have bought some matching thread while I was in Raystich at lunch. With the dark buttons, the white holes seemed off. Plus as the fabric also unravels in front of my, the buttoon holes looks extra sloppy with the fabric threads bursting. So I experimented with reducing the size of the button hole – but I made them too small to actually use. I kept experimenting until I got. Then I tried to replicate it,and took three more attempts before I got it again.
When I began in earnest to sew the holes on the dress I began from the bottom up, figuring it would give me extra time to get them perfect before reaching the really obvious ones. Version A which I am making calls for 6 5/8″ buttons, the ones I have are slightly under 5/8″ but I figured they’d do. And I bought 7 cause when you loose one down the road, you can never find a suitable replacement. So one goes in the button collection. Except I realised as I did the last button hole that I had marked and made 7 button holes – lucky for contingency planning eh?
Before I knew it I was all done. A final press and bingo! It is pretty beautiful if I do say so myself, although strangely a little looser than I had expected.


The extra care you took with the dress construction really paid off! It’s fantastic!
LikeLike
Thank you – it has def been a good lesson for me. I feel like I have a real high quality item here which will withstand all the wear I plan to throw at it!
LikeLike
Gorgeous! Put a bird on it – works every time.
LikeLike
Thank you! Who could resist putting a bird on pretty much anything?
LikeLike
That is a carefully constructed dress. I can see that it will last a long time. Very nice!
LikeLike
Thank you Linda – I think it is one of my best sewing jobs in terms of construction. And I imagine it’s going to see me through many a summer!
LikeLiked by 1 person
It’s quite, quite lovely! You’ll so enjoy wearing such a carefully constructed garment.
LikeLike
Thank you! I’m already enjoying wearing it and have had soo many comments on it in the office today.
LikeLike
I’m not in the least surprised.
LikeLiked by 1 person
I love your cute bird dress! It fits really nicely and is so flattering on you.
LikeLike
Thank you so much!
LikeLike